Pages

Monday, August 29, 2011

Healthy Homemaking Series: Oats

Baby Step 15 - Cooking Oats (and Other Grains)

Challenge: Learn to properly prepare whole grains using the soaking method.

Why: Oatmeal is cheap and wholesome, full of protein, fibre, vitamins, and minerals.  Soaking is important for without it the phytates present in dry grains can lead to mineral loss, allergies, and irritation of the intestinal tract.

How: This challenge made me cringe.  I hate oatmeal.  I can scarf down the instant packets, but real oatmeal?  Sick.  Apparently there is a right and a wrong way to do it, so I am hoping this new method will make it tastier.

1. In the evening put oats and the appropriate amount of water into a pot. (For rolled oats the ratio is 1-1 1/2 cups of water to 1 cup of oats.)
2. Add 1 tbsp of acidic liquid - yogurt, kefir, buttermilk, whey, apple cider vinegar, or lemon juice
3. In the morning, turn on the stove and cook the oats according to the type.  They will require less cooking time after being soaked.
4. For rolled oats bring to just boiling, then turn down to low to simmer with the lid on for 5 minutes.
Method from Healthy Homemaking by Stephanie Langford.

Ta da!

I am sad to say, I still hate it.  I tried it first with cinnamon and honey (as pictured above), but it didn't taste any better.  Brad then added jam to it which made it tolerable but certainly not something I would choose to eat.  Other than my two bites, Brad ate it, (Husbands are good for that.) and even he didn't particularly like it either. Unfortunately, oatmeal is not something I can see myself making in the future.

Do you know how to make oatmeal tasty?

PS -
On Wednesday Brad and I are taking a trip from our home in BC, over to Sask, and then back again with a stop in northern Alberta.  For my next two blog posts, I will not be doing any baby steps since I will not be at home.  They will instead be product reviews, which I hope you still check out!

Thursday, August 25, 2011

Healthy Homemaking Series: Repurposing

Baby Step 14 - Creative Repurposing

Challenge: Find a way to repurpose an item you would normally throw out.

Why: Repurposing is good for the wallet as well as the environment.  Reusing items cuts down on waste, unnecessary purchases, and ensures that everything is used to its full potential.

How:  This is something I struggle with.  I have a hard time thinking creatively to begin with, let alone thinking so far outside of the box as to come up with additional uses for items that I have been led to believe have only one purpose.  I had to really think to do this challenge, which made it a real challenge for me.  Here is what I came up with.

Fabric Softener Sheets for Freshness

After discovering The Wonders of Vinegar in a previous challenge, I have been avidly using white vinegar in my washing machine as a fabric softener and static reducer.  I thought to myself, "What will I do with all these fabric softener sheets now?"  I was tempted to throw them away, so I am glad this challenge came along to stop me.  They are perfect to stuff into shoes, drawers, or on clothes hangers to keep your articles fresh.

Toothbrush for Lint

After a good teeth cleaning at the dentist, I received a new toothbrush.  My previous toothbrush wasn't really worn out yet, but that is obviously something you can't give away.  Luckily I remembered the mug of toothbrushes my mother always kept in the laundry room.  They are the easiest tool for removing lint from the dryer lint screen, cleaning off my reusable dusting mitt and dry mop pad (as seen here) between washes or scrubbing in stain remover on clothing.

 Cards into Gift Tags

I never save cards.  I am not sentimental and rarely have emotional attachments to objects.  That is why I decided to cut up the Christmas cards I received last year to make gift tags for the presents I am giving away this year.  They're cute, festive, and good for the environment.

Anther two ideas I have mentioned in earlier posts are saving emptied jars to use for food storage and using newspaper as gift wrap.

What items have you repurposed?

Monday, August 22, 2011

Healthy Homemaking Series: Stuff

Baby Step 13 - The Story of Stuff

Challenge: Watch the video on the The Story of Stuff website with your family.

Why: This video is intended to be an eye-opening portrayal of the negative effects of consumerism.  It will challenge your thinking about possessions, where they come from, their true value, the domino effect of all the choices that we all make each day, and your place in it all.

How:  Brad and I and one of our best friends sat down together to watch the 20 minute video.


The Story of Stuff is narrated by a well educated, experienced woman who makes the information easy to understand and keeps it engaging with the use of simple animation.  It certainly contains a message that needs to be heard.  Some of the information I knew, but I learned a lot of new stuff too.  It goes through the system of extraction, production, distribution, consumption, and disposal showing how and why this can't work for the planet or us as people if we carry on the way we are.

I sometimes make the mistake of believing everything I hear or read without much thought, and thus I was glad to be watching the video with Brad and our friend as they are two intelligent, well educated, critical thinking men.  They felt that the video was sometimes overly biased, and that some of the facts may have been somewhat misleading.  It is always good to take everything you hear with a grain of salt, even if it's a message you believe in.  Overall, we all enjoyed and appreciated the video.  I was happy to have seen it and am glad to promote and support it.

This challenge came at the perfect time for Brad and I.  Just a week ago, we had decided that we had too much "stuff" and wanted to take on a more minimalist lifestyle.  We are on a mission to clear out our place, and this video is definitely some added motivation.

I encourage you all to take a little time to watch The Story of Stuff, especially with your families, and discuss it afterwards!


If you really enjoyed that, there are more videos to check out on their website including The Story of Electronics, The Story of Cosmetics, The Story of Bottled Water, and more!

Friday, August 19, 2011

Healthy Homemaking Series: Homemade Condiments

Baby Step 12 - Homemade Condiments

Challenge: Make any condiment homemade.

Why: There are so many unnecessary ingredients in store bought condiments including sugar, preservatives, MSG, colouring, white vinegar (stripped of nutrients) and lots of table salt.  Homemade equivalents can be quick, simple, and wholesome.

How: I have been wanting to make my own ketchup for a while now.  This gave me the push I needed to seek out a suitable recipe, and just do it.  I found this recipe on the Epicurious website.  It was the most basic, simple one I came across.
  • 1 (28-oz) can whole tomatoes in purée (I just used a can of crushed tomatoes)
  • 1 medium onion, chopped
  • 2 tablespoons olive oil
  • 1 tablespoon tomato paste
  • 2/3 cup packed dark brown sugar
  • 1/2 cup apple cider vinegar
  • 1/2 teaspoon salt
Chop onion and cook it in the oil for about 8 minutes (until soft) over medium heat.  Add the remaining ingredients (blend tomatoes first if you use whole ones) and stir over low-medium heat.  Allow to simmer for about 1 hour, stirring occasionally.

Pour half at a time into a blender and blend until smooth.

Pour into suitable containers and keep in the fridge.  Chill for at least 2 hours before using the first time.

I love the flavour!  It has a rich tomato taste with a bit of a kick from the onion and vinegar.  It doesn't taste like Heinz, so don't expect that.  It is so much better.  I read some reviews and noticed some people were cutting down the sugar and apple cider vinegar while added garlic or other spices.  Next time I will experiment with those alterations as well.  Cheap, tasty, healthy.  What else could I ask for?

I do have a warning though... the clean up is intensive! And wear an apron!


Have you made any condiments at home?

Monday, August 15, 2011

Healthy Homemaking Series: Evaluating Fat Choices

Baby Step 11 - Evaluating Fat and Oil Choices

Challenge: Remove one bad fat or oil choice, and add one good one.

Why:
The fats we ingest have an effect on our hormones, skin, tissue, hair, brain development and function, heart health, cancer risk, and more.  This is why the type and quality of fats chosen is critical.  It is also important to note that some fats are only suitable when produced, stored, or used in particular ways.

How: I had a bit of a hard time with this baby step because I really rarely use fats.  I only own organic butter (which I switched to from margarine in the Lighten Up Your Pantry baby step post) and extra virgin olive oil.  I was pleased to see that these are both considered good fat choices.  I wasn't particularly into the idea of buying another type of oil from the good fats chart as they are expensive and mostly said to use sparingly anyways.  Instead I am just going to stick with what I have and talk about that.

 Organic butter.

According to Stephanie's The Good Oils chart, butter is useful for baking, frying, sauteing as well as spreading on toast or adding to steamed veggies.  Buying organic is ideal since most toxins are stored in the fat of animal products.

Extra virgin olive oil.

Extra virgin olive oil is best for non-heated use such as salad dressings or dipping bread but can also be used for frying at low temperatures.  Look for tins or dark glass bottles and store it out of the light to prevent spoiling.  Extra virgin is a better choice than virgin which is a better choice than regular.

Other good fats I may have to consider trying in the future are...
-coconut oil
-palm oil
-grapeseed oil
-sesame oil
-sunflower oil
-peanut oil
-flax oil

What fats and oil do you use?

Friday, August 12, 2011

Nature's Bounty

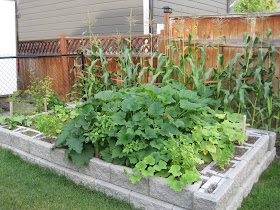
Just a little bonus post to show you how our garden's doing.  As I've written before, we have a tiny garden at our home, but we also have an amazing garden that we share and work on together with 2 other couples.

The garden at our house is quite pitiful.  Even in the summer, we only get about 3-4 hours of sunlight a day, so it's having a hard time.  The "community" garden though is growing beautifully!  We stopped by Thursday evening to do some weeding and grab some goodies.

Raised garden beds.


 Side garden.

 Taking home wax beans, zucchini, lettuce, spinach, and herbs.

In our garden we've got carrots, radishes, strawberries, blackberries, raspberries, potatoes, yellow wax beans, green beans, an assortment of peas, green onion, tomatoes, broccoli, lettuce, spinach, green peppers, cucumber, zucchini, squash, corn, parsley, basil, dill, cilantro, and probably even more than I'm forgetting.  It's so exciting!

Do you have a garden?  What do you or would you like to grow?

Thursday, August 11, 2011

Healthy Homemaking Series: Cleaning Au Naturel

Baby Step 10 - Cleaning Au Naturel

Challenge: Choose one household cleaner to replace with a less toxic, more environmentally friendly option.

Why: Cleaning products in the stores are full of toxic chemicals, dangerous fumes, and non environmentally friendly substances.  They have harmful effects on our bodies, threaten water quality and wildlife, and are dangerous to have around children.

How:
This week I made laundry detergent, a multi purpose cleaner, and an air freshener spray.  I have only used the laundry detergent so far, and thus that is what I will talk about in this post.  The others will be coming too though!

I've moved to a new website! Head on over to Heartful Habits to get the laundry detergent recipe (and a natural fabric softener) from this post. Thanks!

Monday, August 8, 2011

Healthy Homemaking Series: What Goes On, Goes In

Baby Step 9 - What Goes On, Goes In

Challenge: Choose 1 item from all toiletry and beauty items to replace with a more natural and healthy alternative.

Why: When we put toxins and chemicals from toiletries or beauty products onto our skin, they head straight into our bloodstream. This can contribute to or even cause:
-cancer
-developmental/reproductive toxicity
-allergies
-immunotoxicity (damage to the immune system)
-neurotoxicity (damage to the brain and nervous system)
-endocrine (hormonal) disruption
-organ system toxicity (damage to important bodily organs)
-irritation (skin, eyes, or lungs)
-enhanced skin absorption (causing the skin to absorb even more chemicals)
-biochemical or cellular level changes
taken from the EWG's Skin Deep website - a very interesting site to browse around

I've written about this before as well, and you can check it out on my Less Is More post.

Ingredient comparison from Less is More post.

How:  I have already begun the process of making over my toiletries and beauty products by either buying natural items or making my own.  You can see some of my endeavors in this area in the following posts.

See the Whiteness, Feel the Shine - easy, homemade toothpaste
Milk, Beyond Nutrition - homemade milk-based facial cleanser
Shampoo-yah! - homemade shampoo
It's Gonna Be a Bright Sun-Shiny Day - homemade hair lightening rinse
Hair Raising Results - homemade hot oil treatment for hair
Bye-Bye Blackheads - homemade blackhead scrub
At-Home Spa - homemade body rub
A Lesson in Fat Cells - homemade cellulite scrub
When You Want to Go Au Naturale - my journey to clear skin with my favourite natural bar soap
Clean and Green - Nature's Gate hair and body products

Are there any products you buy natural or make at home?

PS - Don't forget to check me out guest blogging on Young and Crafty tomorrow at 8 AM!

Thursday, August 4, 2011

Healthy Homemaking Series: Meal Planning Primer

I am really feeling this layout make over.  I'd love to hear any of your thoughts on it.  Now on to our topic for the day...

Baby Step 8 - Meal Planning Primer

Challenge: Make a meal plan of dinners for the week.

Why: Meal planning helps to be purposeful and intentional about food.  It is a tool to be able to make affordable and healthy meals that are also delicious and as simple and quick as possible.

How:  These are the steps that Stephanie uses in particular and our experiences with them.  Keep in mind that there are many different styles and techniques for meal planning though.

1. Take a quick inventory and put first things first - We looked through our pantry, fridge and freezer at what we had already.

2. Sit down with my planner and look at my week - We keep a white board calender on the fridge.  For us, we need to keep in mind any nights that we'll be out, having company, or that Brad will be at work in the evening.  This was a pretty hectic week for us with regard to suppertime.  We were having a day of fasting and prayer on Tuesday so no dinner needed, then invited out for dinner on Wednesday for a birthday, and Brad was going to be working Monday, Tuesday, and Thursday evenings.

3. Use a favourite meal list - We do not have a written out list of our favourite meals, but I can see how this would be useful and think I might put one together eventually.  We just recently became vegetarians so because we are in the middle of changing our whole diet, it might be a little while before we know what our new favourites will be.

4. Have a basic schedule for each week - I love this idea!  She has a certain theme/category for each day of the week (chicken, fish, red meat, vegetarian, crock pot, etc) which simplifies the choosing process for each day.  The one that we have come up with is as follows.  Sunday - Left Overs/Easy, Monday - One Dish Meals, Tuesday - Meal Salads, Wednesday - Pasta/Noodle Dishes, Thursday - Sandwiches/Wraps, Friday - Skillet Meals, Saturday - Brad's Choice

5. Use a 2-week rotation -Stephanie says that this is a step where she differs from most people.  She sticks to her menu for the first week, but then attempts not to go grocery shopping for the second week by using up left overs and the groceries she purchased from the first week.  I like the idea, but don't think we will use it. We eat so much fresh fruits and vegetables that need to be bought pretty well weekly.  Also, I have never really found that we have many left overs.  (Brad takes care of that, haha.)

Here is how our week's menu turned out.

Sunday - Quinoa Burger Patties with Cooked Veggies (previously had made a big batch of patties)
Monday - Vegetarian Lasagna (will be freezing as well to use for meals to come)
Tuesday - nothing (fasting)
Wednesday - going out
Thursday - Black Bean Veggie Wrap
Friday - Tofu Stir Fry
Saturday - Quesadillas with Pan Fried Veggies

This has inspired my next crafty project to be making a really awesome menu to hang somewhere in the kitchen.  I have found some inspiration in these...

 The first is from le petit Yaka moderne which is all in French, and the second is from The Idea Room.

Do you menu plan?  What style or techniques do you use? 

Bonus:

I am so excited to announce that I will be guest blogging on Young and Crafty on Tuesday, August 9th at 8 AM (though I'm not sure what time zone that is in).  I'll remind you again when it's closer, and I hope you will check it out.

Monday, August 1, 2011

Healthy Homemaking Series: A Good Egg

Baby Step 7: A Good Egg

Challenge: Consider buying a higher quality of eggs than you are.

Why: Eggs are considered to be one of the most nutritionally dense foods out there, but you're not going to be getting all that goodness from factory farmed eggs.  These eggs are from hens living in poor conditions receiving antibiotics and low quality nourishment. These account for an estimated 98% of Canada's eggs.  Free range chickens with the ability to roam and eat a healthful, natural diet produce far superior eggs.  They contain higher omega 3 concentrations, more vitamins A, E, and beta-carotene, and are usually free of toxins.

How:  Brad and I looked around for free range eggs at the regular grocery stores and health food stores.  The most economical option had been from Nature's Fare Market.  Recently though we just discovered at the farmer's market even better priced farm fresh, free range eggs from unmedicated hens that are local to top it all off.  Needless to say, we were excited.

Meadowlark Farm eggs from the farmer's market.

The first time I cracked open a free range egg, I was surprised.  The egg shell was nice and strong.  After breaking it into the pan, I saw that it contained a beaming, bright orange egg yolk which was firm and plump.  I looked into this and found out that the healthier the chicken (in terms of environment and diet), the brighter the yolk will be.  This in turn means that the brighter the yolk, the higher quality and more nutritious the egg will be for us.  Most people said they find they taste better as well, which I can attest to.

Just look at these bright, delicious, healthful scrambled eggs I had for breakfast.

What type of eggs do you buy?